After getting my head around the input/output part of my little NodeMcu board, I set myself another challenge: to control a laser over WiFi.
The laser
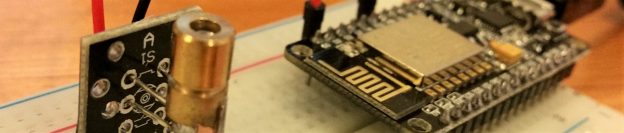
 One of the items I brought when I first received the NodeMcu board, along with a basic electronics kit, was a selection of sensors and other small modules. This included a basic laser, which is the one I will be looking to control over WiFi.
The setup was pretty simple. Pin D2 from the board, to the input of the laser, to ground. On my first attempt I did try to add a resistor to the mix, however since the laser refused to even turn on, I assumed that the laser would add enough resistance without it.

The code
My code was based largely on examples from the NodeMcu documentation using the WiFi and net modules.
Connecting to the WiFi (as discussed previously) is a very simple affair. Set the WiFi mode to “STATION” to allow it to connect to access points, put in the config, and it will connect. I was however interested to see the “STATIONAP” mode as well, which allows you to create a local WiFi connection as well as connecting to a router. Not attempted to use that mode yet, but could see it being useful where you want your device to connect to your router, as well as provide a local connection for configuration.
For this example I used pin 1 for the laser, so created a variable to track the state, set the mode to “OUTPUT” and turned if off to start with. Don’t want to accidentally be turning it on when I’m staring into the circuit.
Creating the TCP server was, again, very easy. The firmware makes life so simple.
Using the net module, I created a new TCP server, as well as two callback functions. The first was to be called on a successful connection, to bind the receive handler. This receive handler (the second function) would then deal with the content. To keep things simple to start with, anything received would toggle the laser.
Last step was to get the server listening, using port 80 (to allow me to easily hit it from a browser) and passing in my connection success function created above.
The net module was also the first time I encountered the colon operator in Lua, which is used to provide a reference of the object to the method. If you’re also not sure of the difference between the colon and dot operator and are interested in finding out, this blog really helped.
-- connect to WiFi AP
wifi.setmode(wifi.STATION)
wifi.sta.config("SSID", "password")

-- set up GPIO pin
pin1Mode = 0
gpio.mode(1, gpio.OUTPUT)
gpio.write(1, pin1Mode)

-- create server
server = net.createServer(net.TCP, 60)

-- set up server callbacks
function onConnectionSuccess(connection)
    connection:on("receive", onReceive)
end

function onReceive(socket, content)
    print("Recieved content on socket, switching laser")
    pin1Mode = 1 - pin1Mode
    gpio.write(1, pin1Mode)
    socket:send("Lasor state: "..pin1Mode)
end

-- connect server
server:listen(80, onConnectionSuccess)

-- print status
print("Set up")
print(wifi.sta.getip())
First test was done via the browser. Although I was able to visit the IP and turn on the laser, I forgot how the browser will make a separate request for the favicon (the little icon which appears in your tab). Because of this, the first request would turn on the laser, and the second would switch it right back off. Although this made me laugh a little, it was a no go.
So I fired up telnet.
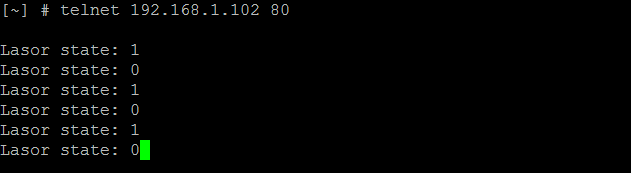
This was much more successful. No silly favicons here. Just had to press “enter” to kick off each request, and it worked perfectly.
With this proof of concept working, I decided to modify the code slightly to allow the client to specify if they wanted the laser on or off in the request. This involved using the state of the art text parsing logic of checking if the received content contained the string “on” or “off”. Top stuff.
-- connect to WiFi AP
wifi.setmode(wifi.STATION)
wifi.sta.config("SSID", "password")

-- set up GPIO pin
gpio.mode(1, gpio.OUTPUT)
gpio.write(1, gpio.LOW)

-- create server
server = net.createServer(net.TCP, 60)

-- set up server callbacks
function onConnectionSuccess(connection)
    connection:on("receive", onReceive)
end

function onReceive(socket, content)
    if string.match(content, "on") then
        print("Laser on")
        gpio.write(1, gpio.HIGH)
        return
    elseif string.match(content, "off") then
        print("Laser off")
        gpio.write(1, gpio.LOW)
        return
    end

    print("Unable to parse request: "..content)
end

-- connect server
server:listen(80, onConnectionSuccess)

-- print status
print("Set up")
print(wifi.sta.getip())
The result
Connecting to the NodeMcu over telnet, typing “on” and pressing enter now turns on the laser, with “off” turning it off. Nice and simple. And because it’s controllable over WiFi, I can even use my phone.
One thing I’m quickly learning is that thanks to the NodeMcu well-documented firmware, creating basic stuff like this is pretty straight forward. Plus, now I have a greater understanding of connecting the NodeMcu to the outside world, there are plenty of opportunities to include this little MCU as part of a larger off-board project. I just need to come up with an idea for one.